|
|
近期进行多机器人编队控制仿真(gps、camera、laser),遇到些许问题,总结如下。
1、基于一个机器人URDF如何在gazebo中仿真显示多机器人——launch文件中使用group标签
<launch>
<!-- 运行gazebo仿真环境 -->
<include file=&#34;$(find gazebo_ros)/launch/empty_world.launch&#34;>
</include>
<!-- begin robot1 -->
<group ns=&#34;ares1&#34;>
<param name=&#34;robot_description&#34; command=&#34;$(find xacro)/xacro $(find urdf_gazebo)/xacro/my_car.urdf.xacro bodyframe:=ares1 ns:=ares1&#34; />
<!-- 运行joint_state_publisher节点,发布机器人的关节状态 -->
<node name=&#34;joint_state_publisher&#34; pkg=&#34;joint_state_publisher&#34; type=&#34;joint_state_publisher&#34; >
</node>
<!-- 运行robot_state_publisher节点,发布tf -->
<node name=&#34;robot_state_publisher&#34; pkg=&#34;robot_state_publisher&#34; type=&#34;robot_state_publisher&#34; output=&#34;screen&#34; >
<param name=&#34;publish_frequency&#34; type=&#34;double&#34; value=&#34;50.0&#34; />
<param name=&#34;tf_prefix&#34; value=&#34;ares1&#34; />
</node>
<!-- node name=&#34;ares_teleop&#34; pkg=&#34;ares_teleop&#34; type=&#34;ares_teleop.py&#34; output=&#34;screen&#34; /-->
<!-- 在gazebo中加载机器人模型-->
<node name=&#34;urdf_spawner&#34; pkg=&#34;gazebo_ros&#34; type=&#34;spawn_model&#34; respawn=&#34;false&#34; output=&#34;screen&#34;
args=&#34;-urdf -model ares1 -param robot_description -x 0 -y 0&#34;/>
</group>
<!-- begin robot2 -->
<group ns=&#34;ares2&#34;>
<param name=&#34;robot_description&#34; command=&#34;$(find xacro)/xacro $(find urdf_gazebo)/xacro/my_car.urdf.xacro bodyframe:=ares2 ns:=ares2&#34; />
<!-- 运行joint_state_publisher节点,发布机器人的关节状态 -->
<node name=&#34;joint_state_publisher&#34; pkg=&#34;joint_state_publisher&#34; type=&#34;joint_state_publisher&#34; >
</node>
<!-- 运行robot_state_publisher节点,发布tf -->
<node name=&#34;robot_state_publisher&#34; pkg=&#34;robot_state_publisher&#34; type=&#34;robot_state_publisher&#34; output=&#34;screen&#34; >
<param name=&#34;publish_frequency&#34; type=&#34;double&#34; value=&#34;50.0&#34; />
<param name=&#34;tf_prefix&#34; value=&#34;ares2&#34; />
</node>
<!-- 在gazebo中加载机器人模型-->
<node name=&#34;urdf_spawner&#34; pkg=&#34;gazebo_ros&#34; type=&#34;spawn_model&#34; respawn=&#34;false&#34; output=&#34;screen&#34;
args=&#34;-urdf -model ares2 -param robot_description -x 0 -y 1&#34;/>
</group>
<!-- begin robot3 -->
<group ns=&#34;ares3&#34;>
<param name=&#34;robot_description&#34; command=&#34;$(find xacro)/xacro $(find urdf_gazebo)/xacro/my_car.urdf.xacro bodyframe:=ares3 ns:=ares3&#34; />
<!-- 运行joint_state_publisher节点,发布机器人的关节状态 -->
<node name=&#34;joint_state_publisher&#34; pkg=&#34;joint_state_publisher&#34; type=&#34;joint_state_publisher&#34; >
</node>
<!-- 运行robot_state_publisher节点,发布tf -->
<node name=&#34;robot_state_publisher&#34; pkg=&#34;robot_state_publisher&#34; type=&#34;robot_state_publisher&#34; output=&#34;screen&#34; >
<param name=&#34;publish_frequency&#34; type=&#34;double&#34; value=&#34;50.0&#34; />
<param name=&#34;tf_prefix&#34; value=&#34;ares3&#34; />
</node>
<!-- 在gazebo中加载机器人模型-->
<node name=&#34;urdf_spawner&#34; pkg=&#34;gazebo_ros&#34; type=&#34;spawn_model&#34; respawn=&#34;false&#34; output=&#34;screen&#34;
args=&#34;-urdf -model ares3 -param robot_description -x 0 -y -1&#34;/>
</group>
</launch>2、机器人如何单独控制、或共同控制运动——namespace、cmd_vel
差速机器人-左右轮xacro驱动配置
<robot name=&#34;my_car_move&#34; xmlns:xacro=&#34;http://wiki.ros.org/xacro&#34;>
<xacro:macro name=&#34;joint_trans&#34; params=&#34;joint_name&#34;>
<transmission name=&#34;${joint_name}_trans&#34;>
<type>transmission_interface/SimpleTransmission</type>
<joint name=&#34;${joint_name}&#34;>
<hardwareInterface>hardware_interface/VelocityJointInterface</hardwareInterface>
</joint>
<actuator name=&#34;${joint_name}_motor&#34;>
<hardwareInterface>hardware_interface/VelocityJointInterface</hardwareInterface>
<mechanicalReduction>1</mechanicalReduction>
</actuator>
</transmission>
</xacro:macro>
<xacro:joint_trans joint_name=&#34;left_wheel2base_link&#34; />
<xacro:joint_trans joint_name=&#34;right_wheel2base_link&#34; />
<gazebo>
<plugin name=&#34;differential_drive_controller&#34; filename=&#34;libgazebo_ros_diff_drive.so&#34;>
<rosDebugLevel>Debug</rosDebugLevel>
<publishWheelTF>true</publishWheelTF>
<publishTf>1</publishTf>
<publishWheelJointState>true</publishWheelJointState>
<alwaysOn>true</alwaysOn>
<updateRate>100.0</updateRate>
<legacyMode>true</legacyMode>
<leftJoint>left_wheel2base_link</leftJoint>
<rightJoint>right_wheel2base_link</rightJoint>
<wheelSeparation>${base_link_radius * 2}</wheelSeparation>
<wheelDiameter>${wheel_radius * 2}</wheelDiameter>
<broadcastTF>1</broadcastTF>
<wheelTorque>30</wheelTorque>
<wheelAcceleration>1.8</wheelAcceleration>
<commandTopic>cmd_vel</commandTopic>
<odometryFrame>odom</odometryFrame>
<odometryTopic>odom</odometryTopic>
<robotBaseFrame>$(arg bodyframe)/base_footprint</robotBaseFrame>
<!-- <robotBaseFrame>base_footprint</robotBaseFrame> -->
</plugin>
<plugin name=&#34;p3d_base_controller&#34; filename=&#34;libgazebo_ros_p3d.so&#34;>
<alwaysOn>true</alwaysOn>
<updateRate>50.0</updateRate>
<bodyName>base_link</bodyName>
<topicName>base_pose_ground_truth</topicName>
<gaussianNoise>0.01</gaussianNoise>
<frameName>world</frameName>
<xyzOffsets>0 0 0</xyzOffsets>
<rpyOffsets>0 0 0</rpyOffsets>
</plugin>
</gazebo>
</robot>如何单独控制各个机器人:
即通过launch文件的group标签,给cmd_vel话题前加上命名空间。命名空间添加失败原因:
1> gazebo标签下的plugin标签里面,有<robotNamespace>/<robotNamespace>,该语句设置此配置中命名空间无法奏效,只需删除该语句;
2> <commandTopic>cmd_vel</commandTopic>设置中,话题cmd_vel前面有 &#39;/&#39;,导致该话题为全局话题,命名空间不起作用,若需单独控制机器人则需要删除该斜杠;若需同时控制多机器人,则保留话题为 /cmd_vel 。
xacro配置文件plugin标签中,若所有话题前面有”/“,则该话题为全局话题,命名空间不起作用,若需命名空间,则需删除”/“。
3、ROS-gazebo如何进行GPS仿真
首先,需下载一个功能包hector_gazebo_plugins。Hector _ gazebo _ plugins 提供了来自 Hector 团队的 gazebo 插件。目前,它包含一个6瓦差分驱动插件,一个 IMU 传感器插件,一个地球磁场传感器插件,一个 GPS 传感器插件和一个声纳测距插件。
介绍:http://wiki.ros.org/hector_gazebo_plugins
安装hector_gazebo_plugins:
sudo apt-get install ros-melodic-hector-gazebo-plugins首先通过xacro文件描述出GPS的物理形状—my_gps.urdf.xacro文件
<robot name=&#34;sensor&#34; xmlns:xacro=&#34;http://www.ros.org/wiki/xacro&#34;>
<xacro:property name=&#34;height1&#34; value=&#34;0.05&#34; />
<xacro:property name=&#34;width&#34; value=&#34;0.05&#34; />
<!-- Used for fixing robot to Gazebo &#39;base_link&#39; -->
<joint name=&#34;fixed&#34; type=&#34;fixed&#34;>
<parent link=&#34;laser&#34;/>
<child link=&#34;sensor&#34;/>
<origin xyz=&#34;0 0 ${height1 / 2}&#34; />
</joint>
<!-- Base Link -->
<link name=&#34;sensor&#34;>
<collision>
<origin xyz=&#34;0 0 ${height1/2}&#34; rpy=&#34;0 0 0&#34;/>
<geometry>
<box size=&#34;${width} ${width} ${height1}&#34;/>
</geometry>
</collision>
<visual>
<origin xyz=&#34;0 0 ${height1/2}&#34; rpy=&#34;0 0 0&#34;/>
<geometry>
<box size=&#34;${width} ${width} ${height1}&#34;/>
</geometry>
<material name=&#34;orange&#34;/>
</visual>
<inertial>
<origin xyz=&#34;0 0 1&#34; rpy=&#34;0 0 0&#34;/>
<mass value=&#34;1&#34;/>
<inertia
ixx=&#34;1.0&#34; ixy=&#34;0.0&#34; ixz=&#34;0.0&#34;
iyy=&#34;1.0&#34; iyz=&#34;0.0&#34;
izz=&#34;1.0&#34;/>
</inertial>
</link>
<material name=&#34;orange&#34;>
<color rgba=&#34;${255/255} ${108/255} ${10/255} 1.0&#34;/>
</material>
<gazebo reference=&#34;sensor&#34;>
<material>Gazebo/Orange</material>
</gazebo>
</robot>然后进行gps功能配置:
<robot name=&#34;sensor&#34; xmlns:xacro=&#34;http://www.ros.org/wiki/xacro&#34;>
<xacro:include filename=&#34;$(find urdf_gazebo)/xacro/my_gps.urdf.xacro&#34;/>
<gazebo>
<plugin name=&#34;gazebo_ros_gps&#34; filename=&#34;libhector_gazebo_ros_gps.so&#34;>
<updateRate>4.0</updateRate>
<bodyName>sensor</bodyName>
<frameId>sensor</frameId>
<topicName>gps/fix</topicName>
<velocityTopicName>gps/fix_velocity</velocityTopicName>
<referenceLatitude>-30.06022459407145675</referenceLatitude>
<referenceLongitude>-51.173913575780311191</referenceLongitude>
<referenceHeading>90</referenceHeading>
<referenceAltitude>10</referenceAltitude>
<offset>0 0 0</offset>
<drift>0.001 0.001 0.001</drift>
<gaussianNoise>0.05 0.05 0.05</gaussianNoise>
<velocityDrift>0.001 0.001 0.001</velocityDrift>
<velocityGaussianNoise>0.5 0.5 0.5</velocityGaussianNoise>
</plugin>
</gazebo>其中,在该gps功能配置的xacro文件中,必须通过 <xacro:include filename=&#34;$(find urdf_gazebo)/xacro/my_gps.urdf.xacro&#34;/> ,导入gps的物体描述xacro文件;即gps的物体描述代码与功能配置代码,需连接在一起。原因:如果是传感器的功能配置plugin标签,则必须在gazebo标签内的sensor标签下,否则不起作用。而该gps的配置gazebo标签内没有sensor标签,若想plugin标签起作用,就得紧接在物体描述代码后,而不能分成两个单独得文件。
同时,若想命名空间起作用,就需主要 话题 前面的”/“。
<frameId>sensor</frameId>中,frameId为GPS基于哪个ID发布的坐标,其中sensor为描述的GPS名称。
(个人简洁,不是很深刻)
4、Laser仿真
雷达仿真注意事项也如上:
雷达(单线)物体描述的xacro文件:
<robot name=&#34;my_laser&#34; xmlns:xacro=&#34;http://wiki.ros.org/xacro&#34;>
<xacro:property name=&#34;support_length&#34; value=&#34;0.15&#34; />
<xacro:property name=&#34;support_radius&#34; value=&#34;0.01&#34; />
<xacro:property name=&#34;support_x&#34; value=&#34;0.0&#34; />
<xacro:property name=&#34;support_y&#34; value=&#34;0.0&#34; />
<xacro:property name=&#34;support_z&#34; value=&#34;${base_link_length / 2 + support_length / 2}&#34; />
<xacro:property name=&#34;support_m&#34; value=&#34;0.02&#34; />
<link name=&#34;support&#34;>
<visual>
<geometry>
<cylinder radius=&#34;${support_radius}&#34; length=&#34;${support_length}&#34; />
</geometry>
<origin xyz=&#34;0.0 0.0 0.0&#34; rpy=&#34;0.0 0.0 0.0&#34; />
<material name=&#34;red&#34;>
<color rgba=&#34;0.8 0.2 0.0 0.8&#34; />
</material>
</visual>
<collision>
<geometry>
<cylinder radius=&#34;${support_radius}&#34; length=&#34;${support_length}&#34; />
</geometry>
<origin xyz=&#34;0.0 0.0 0.0&#34; rpy=&#34;0.0 0.0 0.0&#34; />
</collision>
<xacro:cylinder_inertial_matrix m=&#34;${support_m}&#34; r=&#34;${support_radius}&#34; h=&#34;${support_length}&#34; />
</link>
<joint name=&#34;support2base_link&#34; type=&#34;fixed&#34;>
<parent link=&#34;base_link&#34; />
<child link=&#34;support&#34; />
<origin xyz=&#34;${support_x} ${support_y} ${support_z}&#34; />
</joint>
<gazebo reference=&#34;support&#34;>
<material>Gazebo/White</material>
</gazebo>
<xacro:property name=&#34;laser_length&#34; value=&#34;0.05&#34; />
<xacro:property name=&#34;laser_radius&#34; value=&#34;0.03&#34; />
<xacro:property name=&#34;laser_x&#34; value=&#34;0.0&#34; />
<xacro:property name=&#34;laser_y&#34; value=&#34;0.0&#34; />
<xacro:property name=&#34;laser_z&#34; value=&#34;${support_length / 2 + laser_length / 2}&#34; />
<xacro:property name=&#34;laser_m&#34; value=&#34;0.1&#34; />
<link name=&#34;laser&#34;>
<visual>
<geometry>
<cylinder radius=&#34;${laser_radius}&#34; length=&#34;${laser_length}&#34; />
</geometry>
<origin xyz=&#34;0.0 0.0 0.0&#34; rpy=&#34;0.0 0.0 0.0&#34; />
<material name=&#34;black&#34; />
</visual>
<collision>
<geometry>
<cylinder radius=&#34;${laser_radius}&#34; length=&#34;${laser_length}&#34; />
</geometry>
<origin xyz=&#34;0.0 0.0 0.0&#34; rpy=&#34;0.0 0.0 0.0&#34; />
</collision>
<xacro:cylinder_inertial_matrix m=&#34;${laser_m}&#34; r=&#34;${laser_radius}&#34; h=&#34;${laser_length}&#34; />
</link>
<joint name=&#34;laser2support&#34; type=&#34;fixed&#34;>
<parent link=&#34;support&#34; />
<child link=&#34;laser&#34; />
<origin xyz=&#34;${laser_x} ${laser_y} ${laser_z}&#34; />
</joint>
<gazebo reference=&#34;laser&#34;>
<material>Gazebo/Black</material>
</gazebo>
</robot>功能配置xacro文件(满足命名空间)
<robot name=&#34;my_sensors&#34; xmlns:xacro=&#34;http://wiki.ros.org/xacro&#34;>
<gazebo reference=&#34;laser&#34;>
<sensor type=&#34;ray&#34; name=&#34;rplidar&#34;>
<pose>0 0 0 0 0 0</pose>
<visualize>false</visualize>
<update_rate>5.5</update_rate>
<ray>
<scan>
<horizontal>
<samples>360</samples>
<resolution>1</resolution>
<min_angle>-3</min_angle>
<max_angle>3</max_angle>
</horizontal>
</scan>
<range>
<min>0.10</min>
<max>30.0</max>
<resolution>0.01</resolution>
</range>
<noise>
<type>gaussian</type>
<mean>0.0</mean>
<stddev>0.01</stddev>
</noise>
</ray>
<plugin name=&#34;gazebo_rplidar&#34; filename=&#34;libgazebo_ros_laser.so&#34;>
<topicName>scan</topicName>
<frameName>laser</frameName>
</plugin>
</sensor>
</gazebo>
</robot>小车集成xaro文件:
<robot name=&#34;my_car_camera&#34; xmlns:xacro=&#34;http://wiki.ros.org/xacro&#34;>
<xacro:include filename=&#34;my_head.xacro&#34; />
<xacro:include filename=&#34;my_base.urdf.xacro&#34; />
<xacro:include filename=&#34;my_camera.urdf.xacro&#34; />
<xacro:include filename=&#34;my_laser.urdf.xacro&#34; />
<!-- show gps -->
<!-- <xacro:include filename=&#34;my_gps.urdf.xacro&#34; /> -->
<xacro:include filename=&#34;ros_control/gps.xacro&#34; />
<xacro:include filename=&#34;ros_control/move.xacro&#34; />
<xacro:include filename=&#34;ros_control/laser.xacro&#34; />
<xacro:include filename=&#34;ros_control/camera.xacro&#34; />
<xacro:include filename=&#34;ros_control/kinect.xacro&#34; />
</robot>最后小车集成图片:
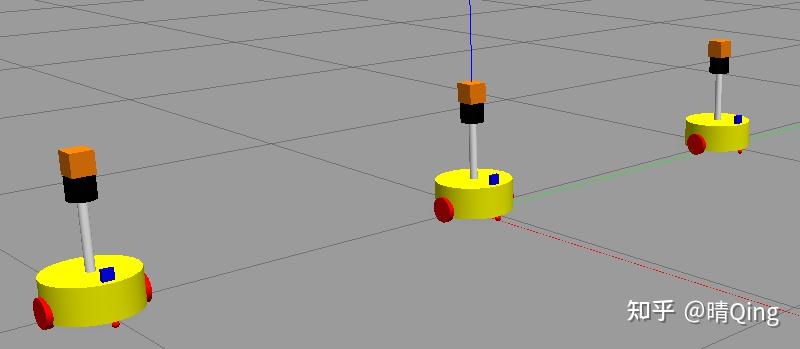
多机器人显示,并可实现多机领航跟随
各位同学若需要全套仿真代码,可评论或私信博主。 |
|


 发表于 2023-1-18 12:35:23