|
|
Visual Studio Code是微软打造的一款开源、跨平台的开发工具,丰富的插件和优秀的使用体验使得越来越多的开发者开始转向VS Code,我也是其中的一员。VS Code的插件都是广大的开发者贡献的,我也想开发一款自己的插件来满足我近期的一个小需求。
满足自己的需求
我曾经断断续续地学了几年的编程仍然停留在差不多hello world的水平,始终无法更进一步,直到我摸索着用python写了一个小工具来解决工作中的重复任务才真正感觉到了进步,入了门。要想学会一样技能,最快最有效的方法就是尝试用它来解决身边的问题,真正的把这个技术用起来。
工作上要经常调试pytest编写的测试用例,我现在的方式是VS Code打开终端输入“pytest -k 测试用例名称”命令进行调测,要调试的用例比较多的话就要频繁地输入命令,我希望能编写一个VS Code插件来自动从光标处读取出测试用例名称,拼接成pytest的调测指令发送到终端运行,这就是我的诉求。
说明:pytest是python语言编写的单元测试框架,如果你不了解pytest也完全不影响,这里直接把pytest认为是可以在cmd下运行的命令即可
生成插件脚手架
要编写VS Code插件,首先要知道开发插件的约定规则,也就是新建插件需要哪些文件、目录如何组织、文件包含什么内容,我们没有必要一一去手动创建,官方提供了交互式工具来自动生成插件的脚手架。
安装脚手架生成工具
# 确保环境已经安装了Node.js和Git
npm install -g yo generator-code执行yo code命令,根据提示输入回答,插件类型选择“New Extension (TypeScript)”,后续选项参考下面的记录,选择完成后将安装相应的依赖并生成插件的目录结构。
C:\xinRepo>yo code
_-----_ ╭──────────────────────────╮
| | │ Welcome to the Visual │
|--(o)--| │ Studio Code Extension │
`---------´ │ generator! │
( _´U`_ ) ╰──────────────────────────╯
/___A___\ /
| ~ |
__'.___.'__
´ ` |° ´ Y `
? What type of extension do you want to create? New Extension (TypeScript)
? What's the name of your extension? pytest-debug
? What's the identifier of your extension? pytest-debug
? What's the description of your extension? 快速调测pytest用例
? Initialize a git repository? Yes
? Bundle the source code with webpack? No
? Which package manager to use? npm
Writing in C:\xinRepo\pytest-debug...
create pytest-debug\.vscode\extensions.json
create pytest-debug\.vscode\launch.json
create pytest-debug\.vscode\settings.json
create pytest-debug\.vscode\tasks.json
create pytest-debug\package.json
create pytest-debug\tsconfig.json
create pytest-debug\.vscodeignore
create pytest-debug\vsc-extension-quickstart.md
create pytest-debug\.gitignore
create pytest-debug\README.md
create pytest-debug\CHANGELOG.md
create pytest-debug\src\extension.ts
create pytest-debug\src\test\runTest.ts
create pytest-debug\src\test\suite\extension.test.ts
create pytest-debug\src\test\suite\index.ts
create pytest-debug\.eslintrc.json
Changes to package.json were detected.
Running npm install for you to install the required dependencies.
added 211 packages in 10s
Your extension pytest-debug has been created!
To start editing with Visual Studio Code, use the following commands:
code pytest-debug
Open vsc-extension-quickstart.md inside the new extension for further instructions
on how to modify, test and publish your extension.
For more information, also visit http://code.visualstudio.com and follow us @code.
? Do you want to open the new folder with Visual Studio Code? Open with `code`查看目录结构,其中最重要的文件是package.json和extension.ts,其他文件暂不关注
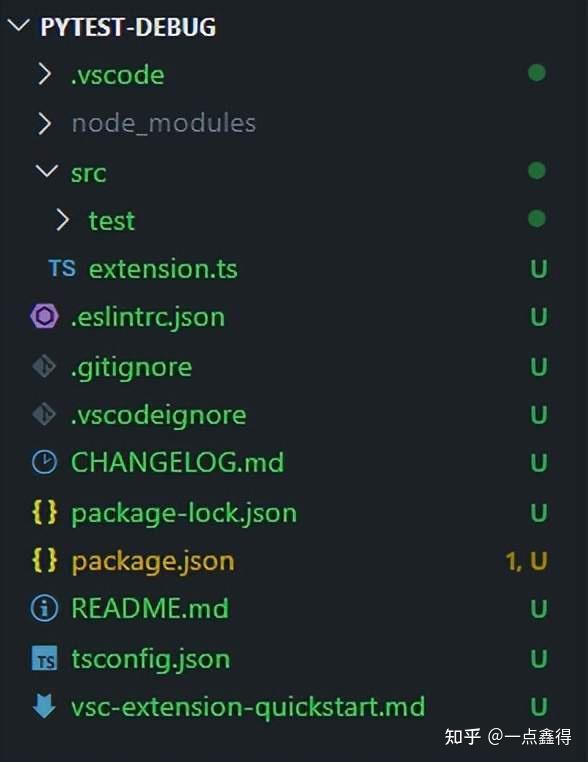
package.json
- activationEvents为contributes.commands注册事件,也可以删除此激活事件,因为 VS Code 从 package.json 贡献声明中自动生成此类事件。
- main为插件的运行入口文件,因为插件使用TypeScript语言编写,编译后会自动生成out/extension.js文件。
- contributes.commands配置执行命令,其中command为需要注册的方法,title为VS Code命令面板显示的命令名称。
{
"name": "pytest-debug",
"displayName": "pytest-debug",
"description": "快速调测pytest用例",
"version": "0.0.1",
"engines": {
"vscode": "^1.75.0"
},
"categories": [
"Other"
],
"activationEvents": [
"onCommand:pytest-debug.helloWorld"
],
"main": "./out/extension.js",
"contributes": {
"commands": [
{
"command": "pytest-debug.helloWorld",
"title": "Hello World"
}
]
},
"scripts": {
...此处省略
},
"devDependencies": {
...此处省略
}
}extension.ts文件主要包含activate和deactivate两个方法,当注册的事件被触发后,active方法就会执行,deactivate方法用于清理操作,这里没有用到这个方法。
// The module 'vscode' contains the VS Code extensibility API
// Import the module and reference it with the alias vscode in your code below
import * as vscode from 'vscode';
// This method is called when your extension is activated
// Your extension is activated the very first time the command is executed
export function activate(context: vscode.ExtensionContext) {
// Use the console to output diagnostic information (console.log) and errors (console.error)
// This line of code will only be executed once when your extension is activated
console.log('Congratulations, your extension "pytest-debug" is now active!');
// The command has been defined in the package.json file
// Now provide the implementation of the command with registerCommand
// The commandId parameter must match the command field in package.json
let disposable = vscode.commands.registerCommand('pytest-debug.helloWorld', () => {
// The code you place here will be executed every time your command is executed
// Display a message box to the user
vscode.window.showInformationMessage('Hello World from pytest-debug!');
});
context.subscriptions.push(disposable);
}
// This method is called when your extension is deactivated
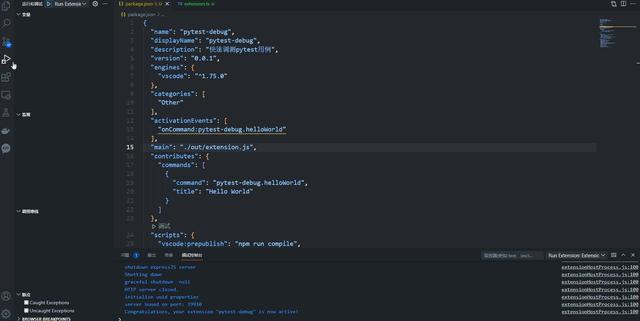
export function deactivate() {}调试插件
不改动任何代码,先调试一下插件,左侧导航栏进入运行与调测,点击运行会新打开一个新的VS Code窗口,Ctrl+Shift+P组合键打开命令面板,输入Hello World命令执行后,右下角会弹出一段消息框“Hello World from pytest-debug!”,这就是extension.ts中定义的回调方法中运行的代码。
写插件代码
要写自己的插件就需要会用VS Code的API,我是初次接触,也不太可能短时间内全部理解它们,好在插件功能足够简单,适合入门,而且官方提供了大量插件的示例代码(
https://github.com/microsoft/vscode-extension-samples),再结合官方API文档(https://code.visualstudio.com/api/references/vscode-api)就可以摸索着前进了。
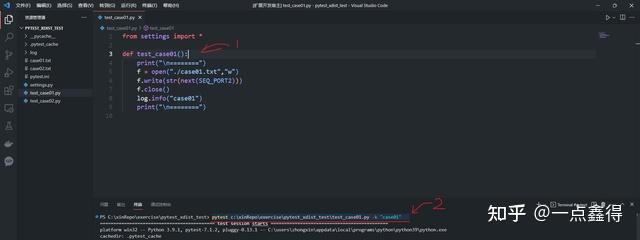
插件计划实现的功能就是命令面板执行pytest debug命令,插件自动提取出下图示例光标所在行的用例名称及当前文件的完整路径,然后拼接成"pytest ${filepath} -k ${casename}"命令并在终端运行。
修改后的package.json文件,改变了contributes.commands的command和title,相应地在extension.ts也需要改变注册方法的名称,另外增加了publisher项,这里设置为自定义的发布ID,发布插件时需要用到
...之前部分无变化
"publisher": "pepperpapa",
...中间部分无变化
"activationEvents": [],
"main": "./out/extension.js",
"contributes": {
"commands": [
{
"command": "pytest-debug.run",
"title": "pytest debug"
}
]
},
...后续部分无变化修改后的extension.ts,代码已添加注释
// The module 'vscode' contains the VS Code extensibility API
// Import the module and reference it with the alias vscode in your code below
import * as vscode from 'vscode';
// This method is called when your extension is activated
// Your extension is activated the very first time the command is executed
export function activate(context: vscode.ExtensionContext) {
// Use the console to output diagnostic information (console.log) and errors (console.error)
// This line of code will only be executed once when your extension is activated
console.log('Congratulations, your extension "pytest-debug" is now active!');
// The command has been defined in the package.json file
// Now provide the implementation of the command with registerCommand
// The commandId parameter must match the command field in package.json
let disposable = vscode.commands.registerCommand('pytest-debug.run', () => {
// The code you place here will be executed every time your command is executed
// Display a message box to the user
// 获取当前打开的文本
let current_editor = vscode.window.activeTextEditor;
let testcase_name = "";
let testcase_path = "";
// 如果vs code有已经打开的文本
if (current_editor) {
// 得到光标所在的行
let line = current_editor.selection.anchor.line;
// 获取当前行的文本
testcase_name = current_editor.document.lineAt(line).text;
// 正则方式取到测试用例名
var reg = /\s*def test_(.+)\(/;
let result = reg.exec(testcase_name);
if (result) {
testcase_name = result[1];
} else {
testcase_name = ""
}
// 取到当前打开文件的完整路径
testcase_path = current_editor.document.uri.fsPath;
}
let terminal;
// 如果vs code没有打开的终端则创建终端,否则取第一个终端作为命令执行的终端
if (vscode.window.terminals.length == 0) {
terminal = vscode.window.createTerminal(`Terminal #pytest`);
} else {
terminal = vscode.window.terminals[0];
}
// 正常获取到了测试用例名称
if (testcase_name.length > 0) {
// 向终端发送拼接好的命令
terminal.sendText(`pytest ${testcase_path} -k "${testcase_name}"`);
// 显示终端
terminal.show(true);
} else {
vscode.window.showErrorMessage("请将光标放置到def test_xxx所在行,以便插件自动提取测试用例名称!");
}
});
context.subscriptions.push(disposable);
}
// This method is called when your extension is deactivated
export function deactivate() {}发布你的插件
调试代码直到满足了预期的需求之后,就可以打包和发布你的插件了,官方提供vsce命令行工具简化插件打包发布流程。
安装vsce工具
npm install -g @vscode/vsce打包插件
tip:打包前需要更新README.md,README.md是对插件的描述,如果没有任何改变的话打包会出现错误提示
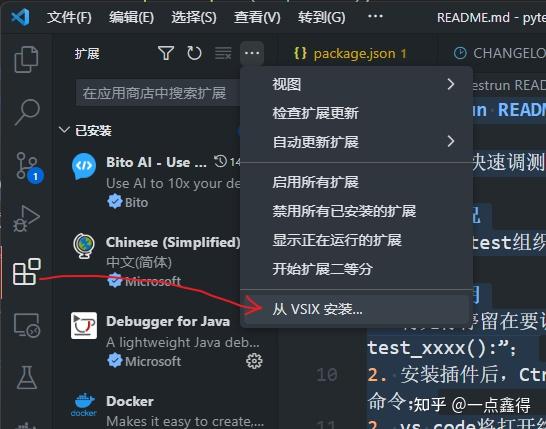
vsce package打包成功后,会在插件根目录下生成pytest-debug-0.0.1.vsix文件,如果你只会在本地使用此插件,可以直接选择.vsix安装即可
发布插件
将插件发布到插件市场必须使用令牌方式发布,需要根据官方指南(
https://code.visualstudio.com/api/working-with-extensions/publishing-extension)先创建自己的组织,然后创建个人令牌并记住令牌。
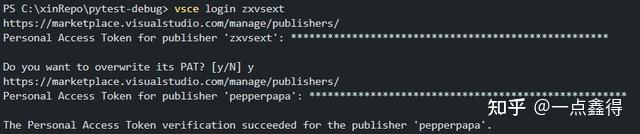
执行vsce login publisher_name( publisher_name为package.json设置的publisher的值,即发布者ID),这里需要输入创建的令牌进行认证
vsce login pepperpapa
执行vsce publisher进行发布
vsce publish
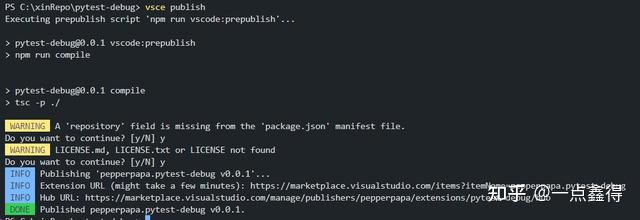

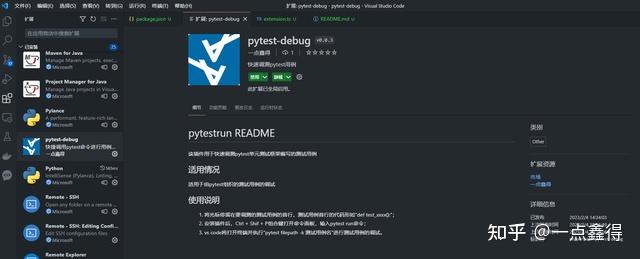
稍等一会,审核通过后就可以在VS Code搜索到你的插件了!
参考文献
- VS Code API | Visual Studio Code Extension API
- https://github.com/microsoft/vscode-extension-samples
- Publishing Extensions | Visual Studio Code Extension API
|
|


 发表于 2023-3-1 14:35:37
