|
|
前言
在工作中我们会将一些共用的包上传到外网的npm上,这样项目中如果需要就直接install就行,但是外网的npm无法保证源码的私密性,这时我们就需要在内网发布一个私有的包管理工具。
私有npm的优势
- 在局域网上部署,保证了源码的私密性
- 因为实在内网使用,依赖包的下载更加快速
使用verdaccio
安装verdaccio
使用npm全局安装
npm install -g verdaccio安装完成以后,输入
verdaccio -h出现版本号等的相关提示,说明verdaccio安装成功。
运行verdaccio
直接执行
verdaccio
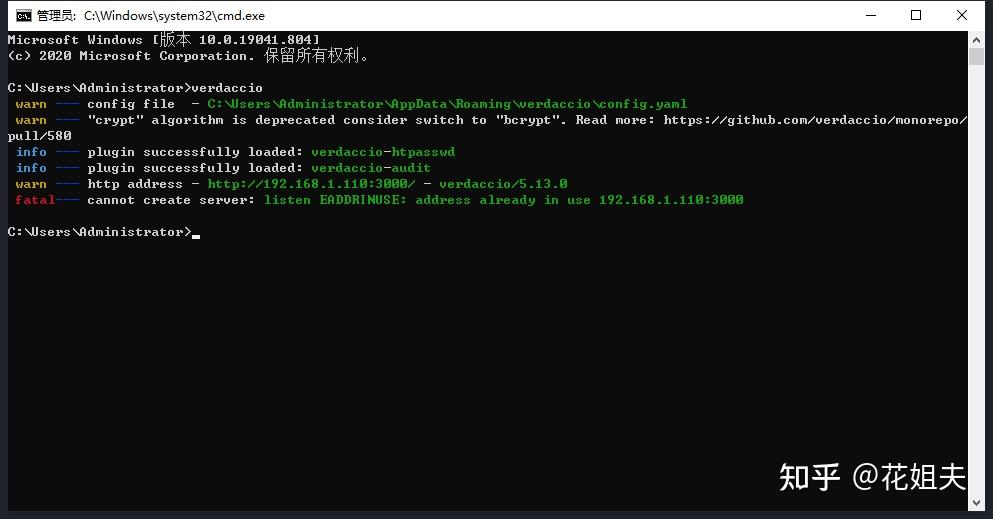
出现这样的提示信息,说明是已经启动verdaccio成功了
访问提示中的链接 http://192.168.1.110:3000/,可以看到这样的页面
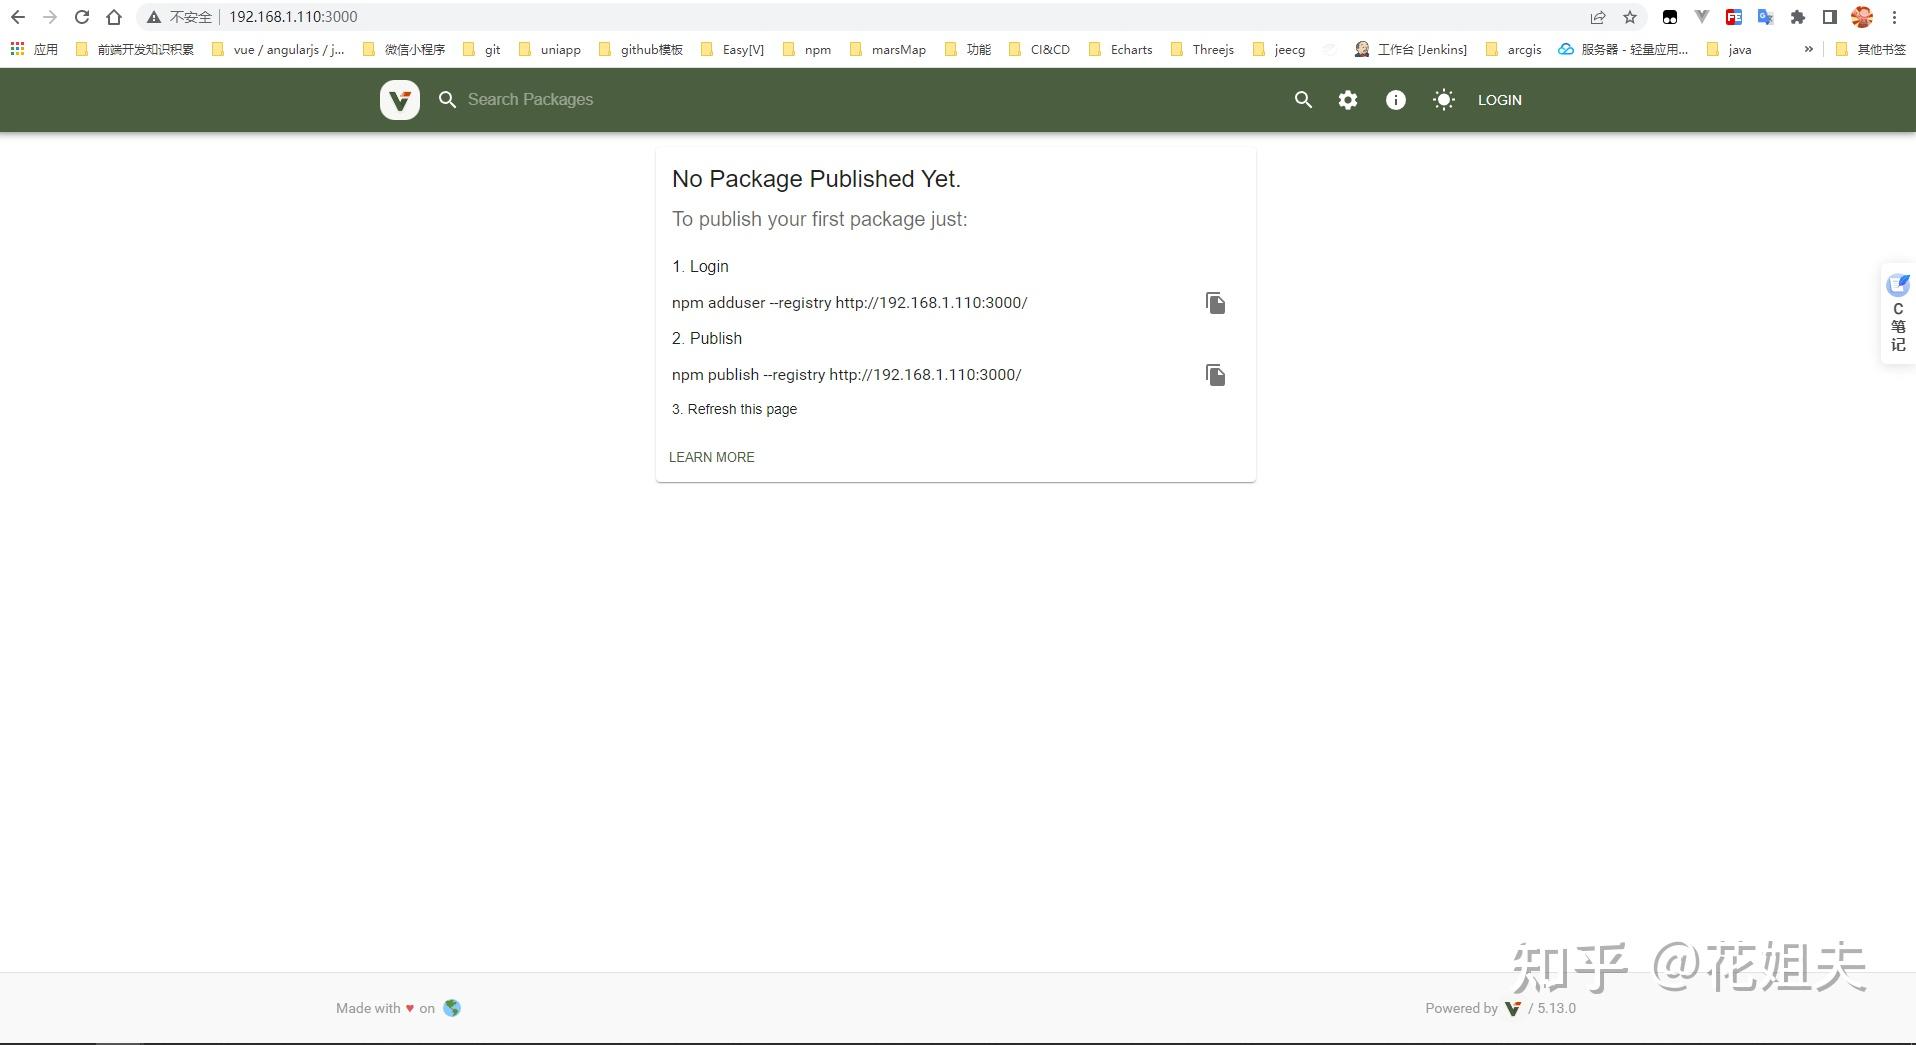
No Package Published Yet. 现在是还没上传任何包的页面
配置verdaccio
注意:上面verdaccio命令执行成功提示中,可以看到配置文件的路径
warn --- config file - C:\Users\Administrator\AppData\Roaming\verdaccio\config.yaml记住这个路径,因为我们需要根据自己的需求修改配置文件,用编辑器打开这个配置文件,verdaccio默认配置文件如下
#
# This is the default configuration file. It allows all users to do anything,
# please read carefully the documentation and best practices to
# improve security.
#
# Look here for more config file examples:
# https://github.com/verdaccio/verdaccio/tree/5.x/conf
#
# Read about the best practices
# https://verdaccio.org/docs/best
# path to a directory with all packages
storage: ./storage
# path to a directory with plugins to include
plugins: ./plugins
# https://verdaccio.org/docs/webui
web:
title: verdaccio
# comment out to disable gravatar support
# gravatar: false
# by default packages are ordercer ascendant (asc|desc)
# sort_packages: asc
# convert your UI to the dark side
# darkMode: true
# html_cache: true
# by default all features are displayed
# login: true
# showInfo: true
# showSettings: true
# In combination with darkMode you can force specific theme
# showThemeSwitch: true
# showFooter: true
# showSearch: true
# showRaw: true
# showDownloadTarball: true
# HTML tags injected after manifest <scripts/>
# scriptsBodyAfter:
# - &#39;<script type=&#34;text/javascript&#34; src=&#34;https://my.company.com/customJS.min.js&#34;></script>&#39;
# HTML tags injected before ends </head>
# metaScripts:
# - &#39;<script type=&#34;text/javascript&#34; src=&#34;https://code.jquery.com/jquery-3.5.1.slim.min.js&#34;></script>&#39;
# - &#39;<script type=&#34;text/javascript&#34; src=&#34;https://browser.sentry-cdn.com/5.15.5/bundle.min.js&#34;></script>&#39;
# - &#39;<meta name=&#34;robots&#34; content=&#34;noindex&#34; />&#39;
# HTML tags injected first child at <body/>
# bodyBefore:
# - &#39;<div id=&#34;myId&#34;>html before webpack scripts</div>&#39;
# Public path for template manifest scripts (only manifest)
# publicPath: http://somedomain.org/
# https://verdaccio.org/docs/configuration#authentication
auth:
htpasswd:
file: ./htpasswd
# Maximum amount of users allowed to register, defaults to &#34;+inf&#34;.
# You can set this to -1 to disable registration.
# max_users: 1000
# Hash algorithm, possible options are: &#34;bcrypt&#34;, &#34;md5&#34;, &#34;sha1&#34;, &#34;crypt&#34;.
# algorithm: bcrypt # by default is crypt, but is recommended use bcrypt for new installations
# Rounds number for &#34;bcrypt&#34;, will be ignored for other algorithms.
# rounds: 10
# https://verdaccio.org/docs/configuration#uplinks
# a list of other known repositories we can talk to
uplinks:
npmjs:
url: https://registry.npmjs.org/
# Learn how to protect your packages
# https://verdaccio.org/docs/protect-your-dependencies/
# https://verdaccio.org/docs/configuration#packages
packages:
&#39;@*/*&#39;:
# scoped packages
access: $all
publish: $authenticated
unpublish: $authenticated
proxy: npmjs
&#39;**&#39;:
# allow all users (including non-authenticated users) to read and
# publish all packages
#
# you can specify usernames/groupnames (depending on your auth plugin)
# and three keywords: &#34;$all&#34;, &#34;$anonymous&#34;, &#34;$authenticated&#34;
access: $all
# allow all known users to publish/publish packages
# (anyone can register by default, remember?)
publish: $authenticated
unpublish: $authenticated
# if package is not available locally, proxy requests to &#39;npmjs&#39; registry
proxy: npmjs
# To improve your security configuration and avoid dependency confusion
# consider removing the proxy property for private packages
# https://verdaccio.org/docs/best#remove-proxy-to-increase-security-at-private-packages
# https://verdaccio.org/docs/configuration#server
# You can specify HTTP/1.1 server keep alive timeout in seconds for incoming connections.
# A value of 0 makes the http server behave similarly to Node.js versions prior to 8.0.0, which did not have a keep-alive timeout.
# WORKAROUND: Through given configuration you can workaround following issue https://github.com/verdaccio/verdaccio/issues/301. Set to 0 in case 60 is not enough.
server:
keepAliveTimeout: 60
# https://verdaccio.org/docs/configuration#offline-publish
# publish:
# allow_offline: false
# https://verdaccio.org/docs/configuration#url-prefix
# url_prefix: /verdaccio/
# VERDACCIO_PUBLIC_URL=&#39;https://somedomain.org&#39;;
# url_prefix: &#39;/my_prefix&#39;
# // url -> https://somedomain.org/my_prefix/
# VERDACCIO_PUBLIC_URL=&#39;https://somedomain.org&#39;;
# url_prefix: &#39;/&#39;
# // url -> https://somedomain.org/
# VERDACCIO_PUBLIC_URL=&#39;https://somedomain.org/first_prefix&#39;;
# url_prefix: &#39;/second_prefix&#39;
# // url -> https://somedomain.org/second_prefix/&#39;
# https://verdaccio.org/docs/configuration#security
# security:
# api:
# legacy: true
# jwt:
# sign:
# expiresIn: 29d
# verify:
# someProp: [value]
# web:
# sign:
# expiresIn: 1h # 1 hour by default
# verify:
# someProp: [value]
# https://verdaccio.org/docs/configuration#user-rate-limit
# userRateLimit:
# windowMs: 50000
# max: 1000
# https://verdaccio.org/docs/configuration#max-body-size
# max_body_size: 10mb
# https://verdaccio.org/docs/configuration#listen-port
#listen:
# - localhost:4873 # default value
# - http://localhost:4873 # same thing
# - https://example.org:4873 # if you want to use https
# - &#34;[::1]:4873&#34; # ipv6
# - unix:/tmp/verdaccio.sock # unix socket
# The HTTPS configuration is useful if you do not consider use a HTTP Proxy
# https://verdaccio.org/docs/configuration#https
# https:
# key: ./path/verdaccio-key.pem
# cert: ./path/verdaccio-cert.pem
# ca: ./path/verdaccio-csr.pem
# https://verdaccio.org/docs/configuration#proxy
# http_proxy: http://something.local/
# https_proxy: https://something.local/
# https://verdaccio.org/docs/configuration#notifications
# notify:
# method: POST
# headers: [{ &#34;Content-Type&#34;: &#34;application/json&#34; }]
# endpoint: https://usagge.hipchat.com/v2/room/3729485/notification?auth_token=mySecretToken
# content: &#39;{&#34;color&#34;:&#34;green&#34;,&#34;message&#34;:&#34;New package published: * {{ name }}*&#34;,&#34;notify&#34;:true,&#34;message_format&#34;:&#34;text&#34;}&#39;
middlewares:
audit:
enabled: true
# https://verdaccio.org/docs/logger
# log settings
logs: { type: stdout, format: pretty, level: http }
#experiments:
# # support for npm token command
# token: false
# # disable writing body size to logs, read more on ticket 1912
# bytesin_off: false
# # enable tarball URL redirect for hosting tarball with a different server, the tarball_url_redirect can be a template string
# tarball_url_redirect: &#39;https://mycdn.com/verdaccio/${packageName}/${filename}&#39;
# # the tarball_url_redirect can be a function, takes packageName and filename and returns the url, when working with a js configuration file
# tarball_url_redirect(packageName, filename) {
# const signedUrl = // generate a signed url
# return signedUrl;
# }
# translate your registry, api i18n not available yet
# i18n:
# list of the available translations https://github.com/verdaccio/verdaccio/blob/master/packages/plugins/ui-theme/src/i18n/ABOUT_TRANSLATIONS.md
# web: en-US
我们可以参考下面这个,按需修改
#
# This is the default config file. It allows all users to do anything,
# so don&#39;t use it on production systems.
#
# Look here for more config file examples:
# https://github.com/verdaccio/verdaccio/tree/master/conf
#
# 用户下载安装的包都被缓存在此配置的目录
storage: ./storage
# 插件所在目录
plugins: ./plugins
# 定制 Web 界面
web:
# 访问服务主页时(http://localhost:4873/),网页标签的title名称,可改成公司名称
title: xxx科技有限公司包管理中心
# Gravatar 头像支持,默认关闭,可打开(http://cn.gravatar.com/)
gravatar: false
# 默认情况下package 是升序自然排序的, 可选值: asc 或 desc
# sort_packages: asc
auth:
htpasswd:
# 存储了加密认证信息的 htpasswd 文件
file: ./htpasswd
# 允许注册的用户最大数量, 默认值是 &#34;+inf&#34;,即不限制
# 可以将此值设置为-1 以禁用新用户注册。
# max_users: 1000
# 如果你要安装的包在私有的npm库里没有找到,就去下面的服务列表里找
uplinks:
npmjs:
url: https://registry.npmjs.org/
taobao:
url: https://registry.npm.taobao.org/
packages:
&#39;@geofly/*&#39;:
# scoped packages
access: $all
publish: $authenticated
unpublish: $authenticated
&#39;**&#39;:
# 默认情况下所有用户 (包括未授权用户) 都可以查看和发布任意包
#
# 你可以指定 用户名/分组名 (取决于你使用什么授权插件,默认的授权插件是内置的 htpasswd)
# 访问权限有三个关键词: &#34;$all&#34;, &#34;$anonymous&#34;, &#34;$authenticated&#34;
# $all 表示不限制,任何人可访问;$anonymous 表示未注册用户可访问;$authenticated 表示只有注册用户可访问
access: $all
# 允许所有注册用户发布/撤销已发布的软件包
# (注意:默认情况下任何人都可以注册)
publish: $authenticated
unpublish: $authenticated
# 如果私有包服务不可用在本地,则会代理请求到&#39;npmjs&#39;
proxy: npmjs
# You can specify HTTP/1.1 server keep alive timeout in seconds for incoming connections.
# A value of 0 makes the http server behave similarly to Node.js versions prior to 8.0.0, which did not have a keep-alive timeout.
# WORKAROUND: Through given configuration you can workaround following issue https://github.com/verdaccio/verdaccio/issues/301. Set to 0 in case 60 is not enough.
server:
keepAliveTimeout: 60
listen: http://192.168.1.110:3000
middlewares:
audit:
enabled: true
# 终端日志输出配置
logs:
- { type: stdout, format: pretty, level: http }
#- {type: file, path: verdaccio.log, level: info}
#experiments:
# 支持 npm token 命令
# token: false
我主要修改的内容是
web
# 定制 Web 界面
web:
# 访问服务主页时(http://localhost:4873/),网页标签的title名称,可改成公司名称
title: xxx科技有限公司包管理中心
# Gravatar 头像支持,默认关闭,可打开(http://cn.gravatar.com/)
gravatar: false
# 默认情况下package 是升序自然排序的, 可选值: asc 或 desc
# sort_packages: ascuplinks
# 如果你要安装的包在私有的npm库里没有找到,就去下面的服务列表里找
uplinks:
npmjs:
url: https://registry.npmjs.org/
taobao:
url: https://registry.npm.taobao.org/packages
packages:
&#39;@geofly/*&#39;:
# scoped packages
access: $all
publish: $authenticated
unpublish: $authenticated
&#39;**&#39;:
# 默认情况下所有用户 (包括未授权用户) 都可以查看和发布任意包
#
# 你可以指定 用户名/分组名 (取决于你使用什么授权插件,默认的授权插件是内置的 htpasswd)
# 访问权限有三个关键词: &#34;$all&#34;, &#34;$anonymous&#34;, &#34;$authenticated&#34;
# $all 表示不限制,任何人可访问;$anonymous 表示未注册用户可访问;$authenticated 表示只有注册用户可访问
access: $all
# 允许所有注册用户发布/撤销已发布的软件包
# (注意:默认情况下任何人都可以注册)
publish: $authenticated
unpublish: $authenticated
# 如果私有包服务不可用在本地,则会代理请求到&#39;npmjs&#39;
proxy: npmjs通过以上参数的配置,我们约定了,如果你发布的包是@geofly前缀的,那就表明是私有包,不会代理到外部。如果发布的包没有@geofly前缀,则会走**的逻辑。
listen
verdaccio的默认端口号是4873,我们可以指定为其他端口号
listen: http://192.168.1.110:3000设置完成以后,重新启动verdaccio,发现端口号变成了3000
配置参数修改完成了,我们可以发布自己的包到私有的npm上了,但是由于我们实际开发中可能需要切换不同的包源,所以我们可以使用包源管理工具nrm。
安装使用nrm
安装
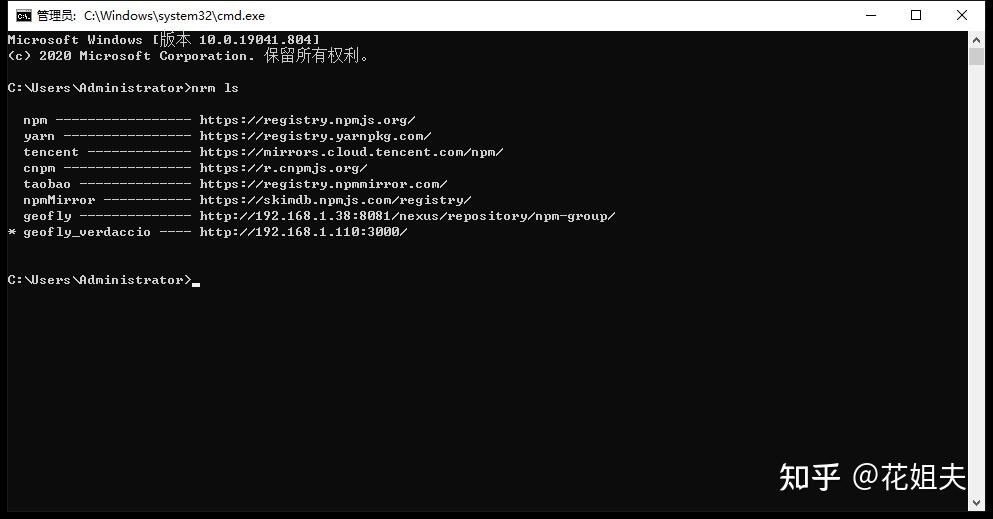
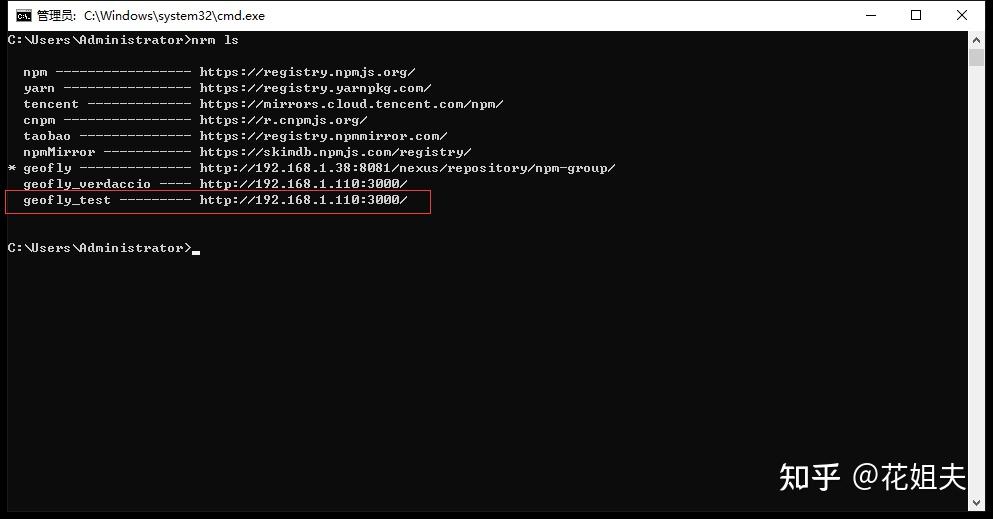
npm install -g nrm查看管理的npm(*星号代表当前使用源)
nrm ls
切换源
nrm use 包源名称
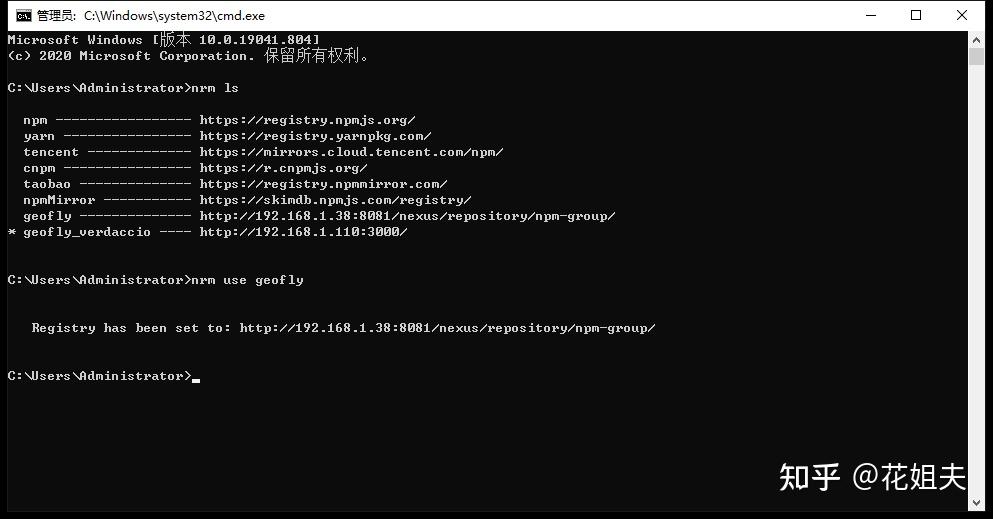
包源切换到了“geofly”
添加源
nrm add 源名称 源路径
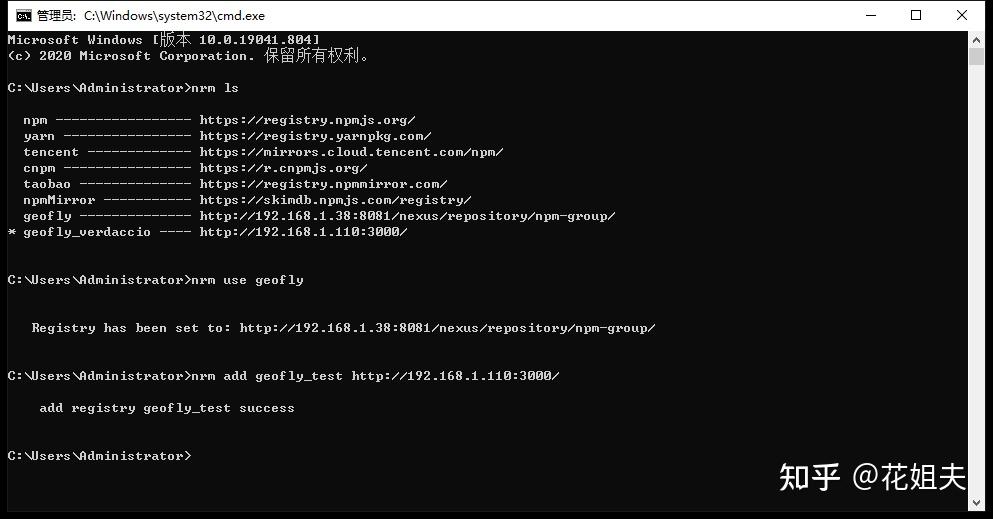
“geofly_test”就是包名称,“http://192.168.1.110:3000/”就是源路径
注意:这里做的就是把上面部署的私有npm,添加到nrm中进行切换管理,名称就叫做“geofly_test”。
上传包到私有npm
通过命令,切换到私有npm
nrm use geofly_test添加注册用户
npm addUser按照提示需要输入Username、Password、Email,就可以注册成功
发布
切换到要发布的包路径下,记得将 package.json文件的name改为verdaccio配置参数设置的“@geofly/common-services”格式的名称,否则发布不到私有npm,其他具体的发布教程请查看花姐夫:前端开发必备技能知识笔记-将vue组件上传npm
执行
npm publish
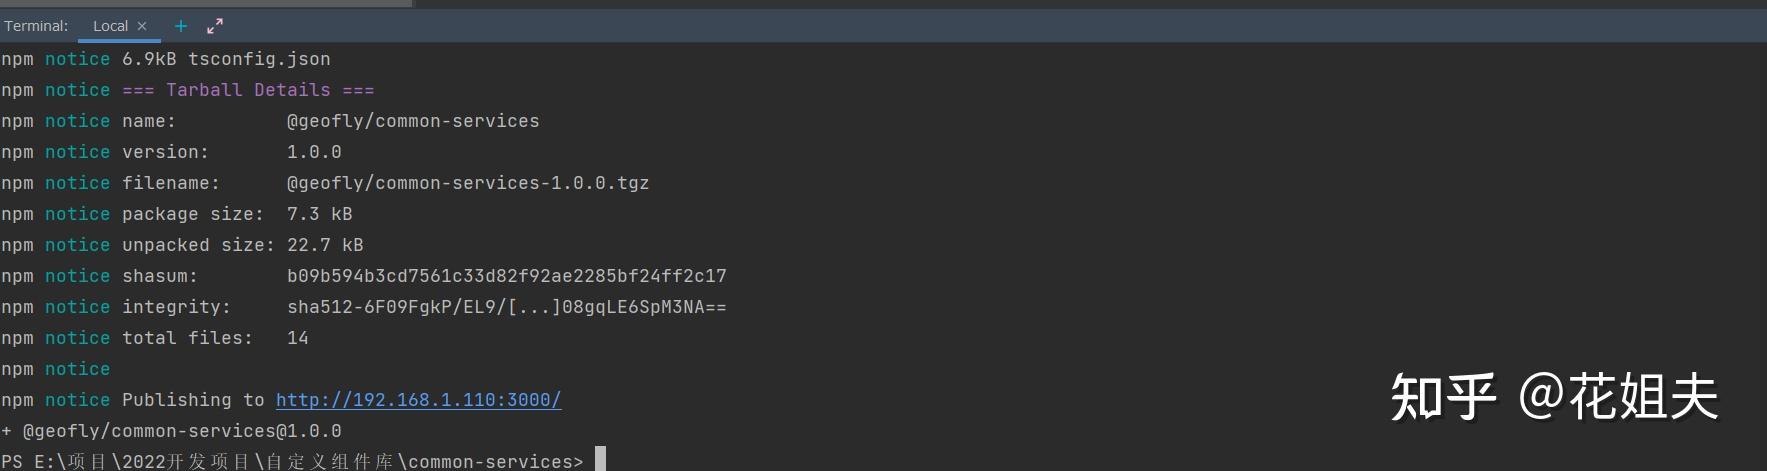
发布成功!!
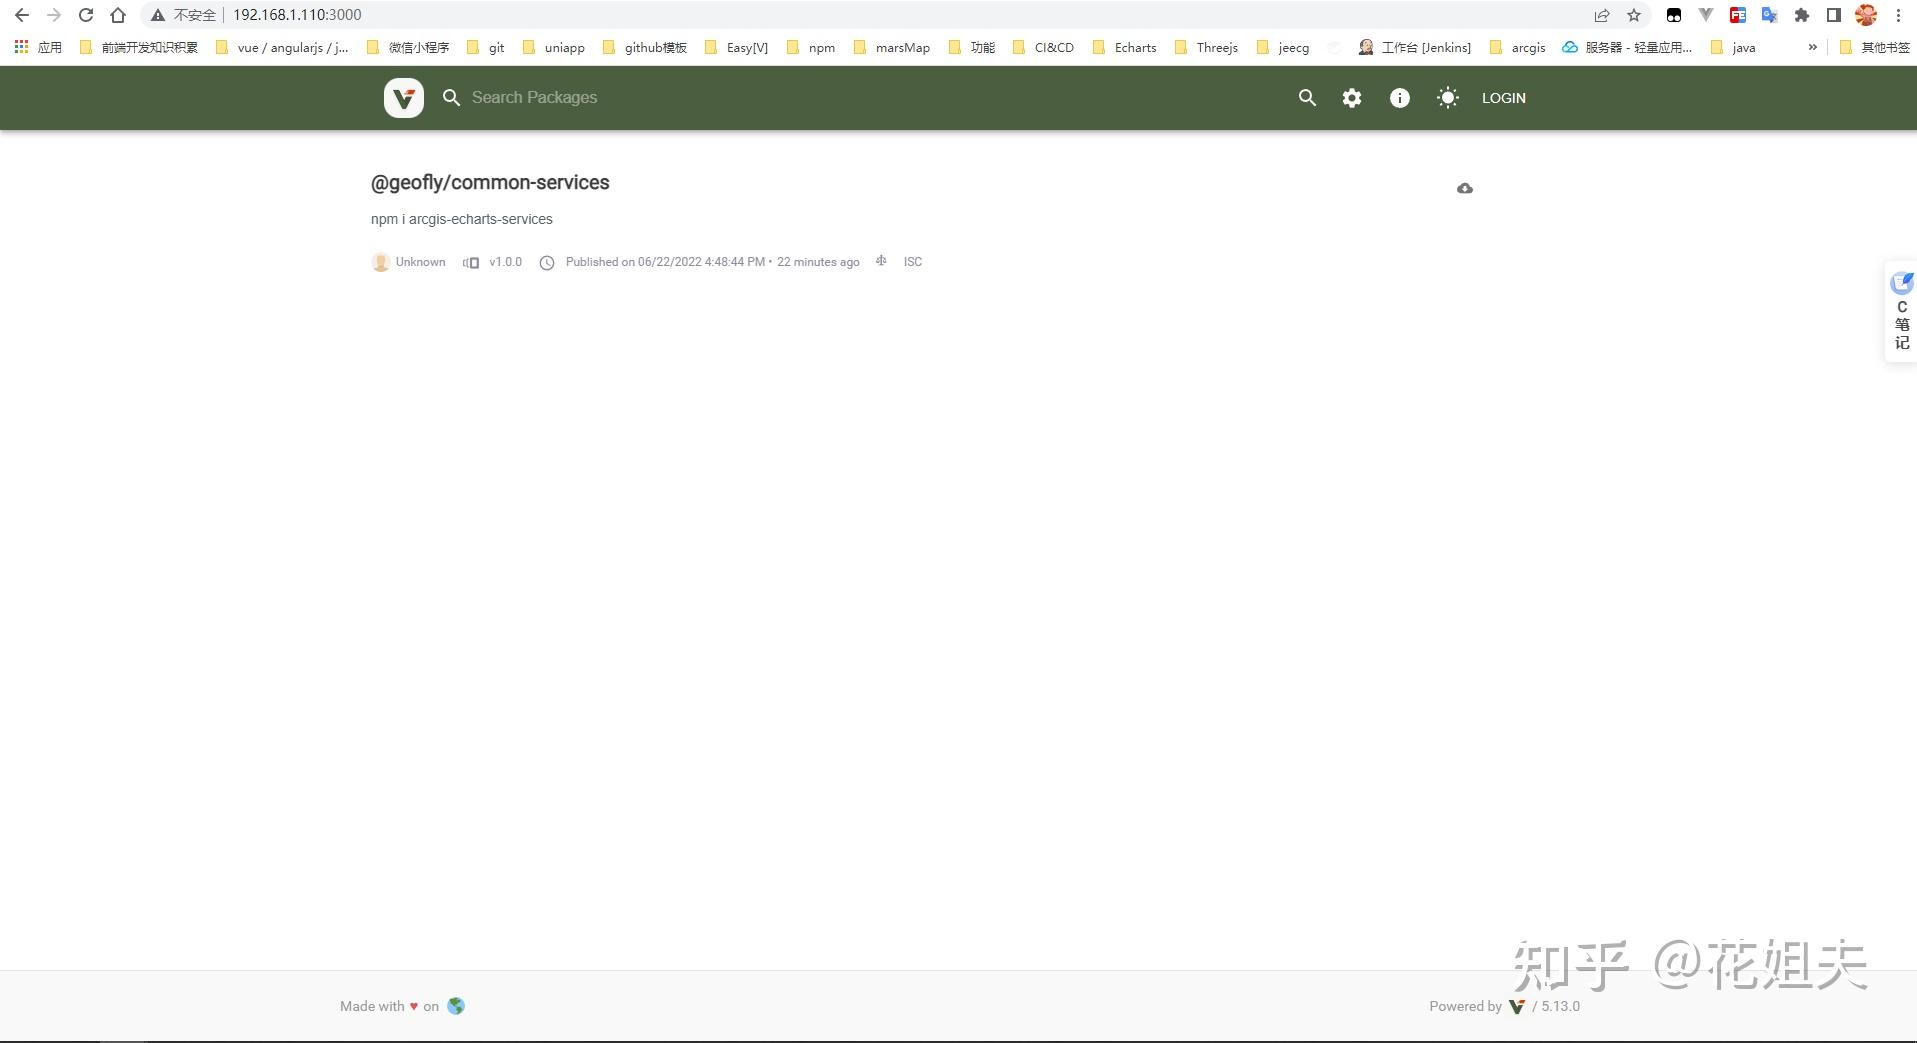
刷新管理页面
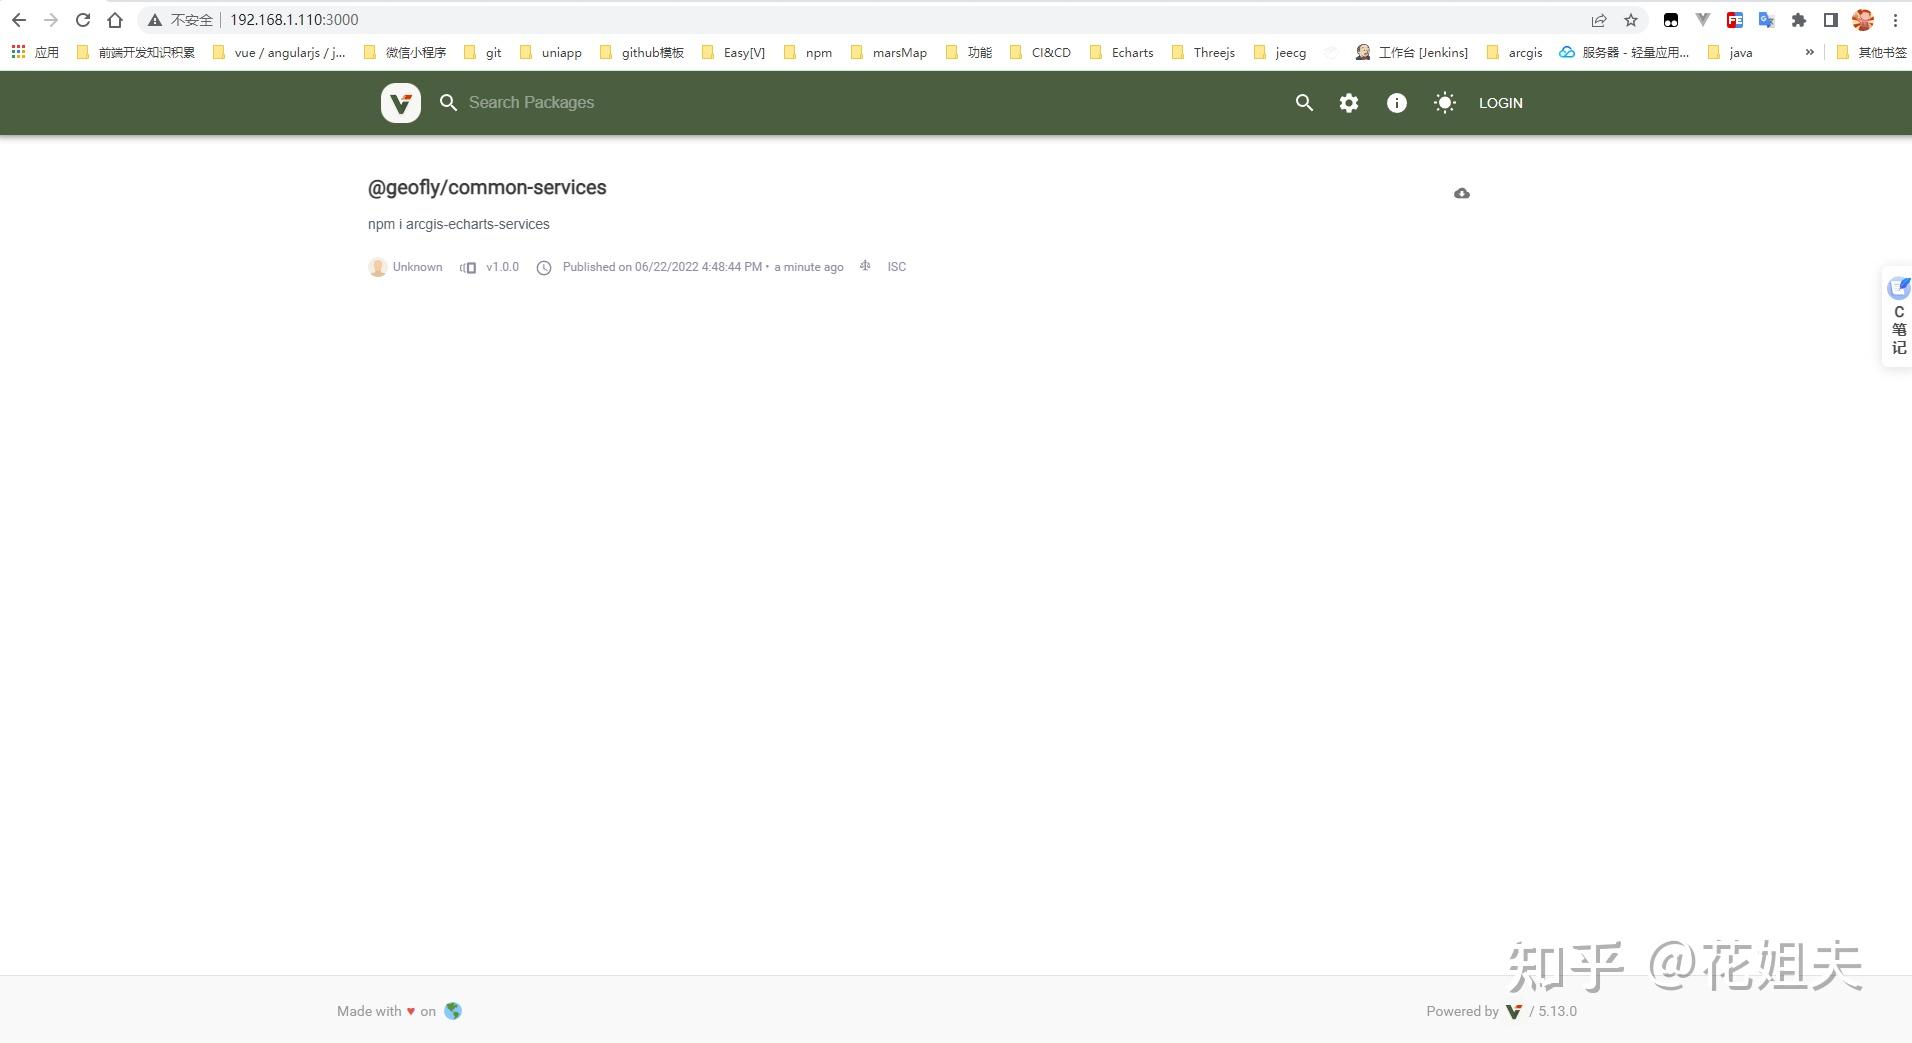
可以看到发布成功的包“@geofly/common-services”
使用pm2
上面的操作已经部署完成,并成功上传了包,但是我们会发现如果关闭了verdaccio启动的命令弹出框,再次刷新私有npm管理页面,页面会报错,说明私有npm没有被启动了,这个时候我们可以使用pm2。
pm2是node进程管理工具,可以利用它来简化很多node应用管理的繁琐任务,如性能监控、自动重启、负载均衡等,而且使用非常简单。
常用命令
- 安装:npm install pm2 -g
- 更新:pm2 update
- 帮助:pm2 --help
- 进程列表:pm2 ls / pm2 list
- CPU监控:pm2 monit
- 显示某个进程详细信息:pm2 show/info/describe/desc 进程名
- 进程状态:pm2 status
- 显示所有应用日志:pm2 logs
- 显示某个应用日志:pm2 logs 进程名
- json化日志:pm2 logs --json
- 启动进程: pm2 start 进程名
- 停止某个进程: pm2 stop 进程名/进程id
- 停止所有进程:pm2 stop all
- 重启进程:pm2 restart 进程名/进程id
- 重启所有进程:pm2 restart all
- 删除某个进程:pm2 delete 进程名/进程id
- 删除所有进程:pm2 delete all
pm2启动verdaccio
执行
pm2 start verdaccio如果执行命令后显示,没有完全启动
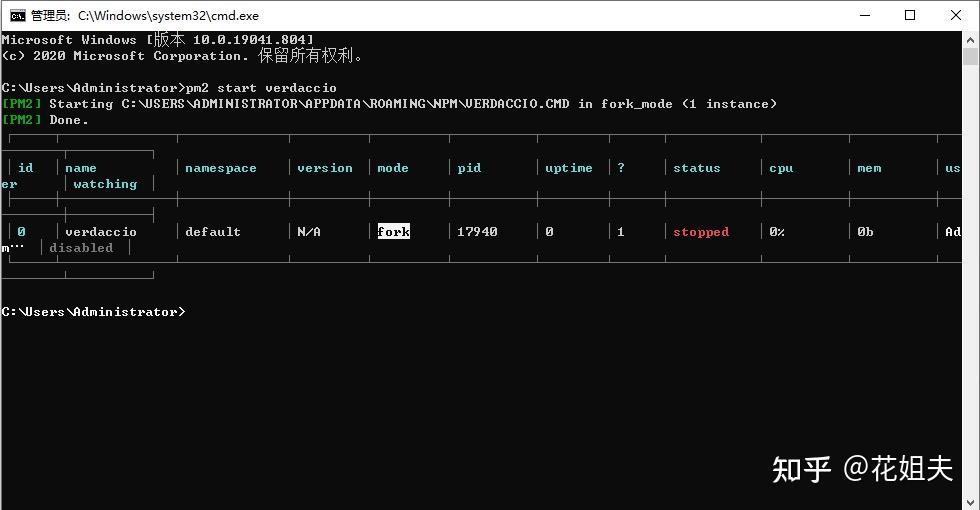
status显示的是“stopped”,所以没有启动成功
找到node_modules下的verdaccio文件夹,打开找到bin文件里面有个verdaccio文件这个就是他的启动文件。比如我的是在C:\Users\Administrator\AppData\Roaming\npm\node_modules\verdaccio\bin目录下。
那么就这样执行
pm2 start C:\Users\Administrator\AppData\Roaming\npm\node_modules\verdaccio\bin\verdaccio
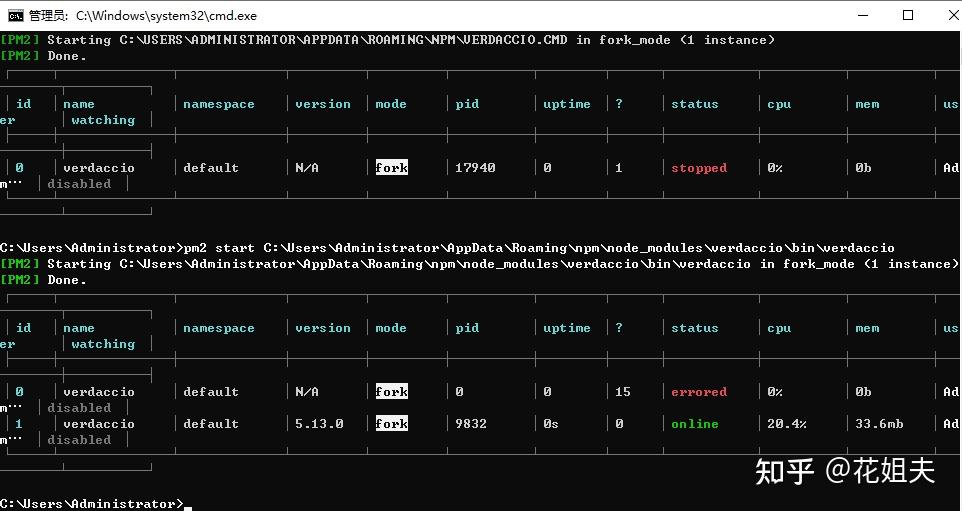
后面加的这条记录status为“online”,说明启动成功
刷新管理页面
nice!!
<hr/>本文参考: |
|


 发表于 2022-9-20 16:05:07